# 2025 Wrapped: Optimizely's Year of AI Acceleration and Opal Momentum
Search(SearchParameters parameters)
{
// embed the query, call the search service, return results
}
[OpalTool(Name = "get-document")]
[Description("Retrieve the full content of a document by path. Use when you need broader context than chunks provide.")]
public async Task GetDocument(GetDocumentParameters parameters)
{
// fetch full document from the service
}
```
The description on each tool is the signal Opal uses to decide when to invoke it. Write descriptions that explain *when* the tool is appropriate, not just what it does. The reasoning agent reads these descriptions when deciding which tools to call for a given query.
Register the tool in `Program.cs` alongside your other services:
```csharp
builder.Services.AddOpalToolService();
builder.Services.AddOpalTool();
// ...
app.MapOpalTools();
```
Then go to Opal configuration in Optimizely One and add your service's base URL as a custom tool source. Opal calls the discovery endpoint automatically, reads the tool definitions, and from that point the tools are available to any agent configured to use them. That's the extent of the integration.
## Trade-offs and honest limitations [#trade-offs-and-honest-limitations]
This approach solves the "data outside Optimizely One" problem, but it introduces new responsibilities.
**You own the infrastructure.** Graph is managed for you. A custom RAG service is yours to deploy, monitor, and maintain. That means a PostgreSQL instance, an Azure OpenAI account for embeddings, container hosting for the service, and a CI/CD pipeline to trigger re-indexing when documents change. The operational overhead is real.
**Search quality depends on your chunking and prompting.** RRF is not magic. Results are only as good as your chunks. If documents are poorly structured, chunks will be incoherent. If tool descriptions are vague, Opal won't know when to use the search tool versus answering from its general knowledge. Expect to iterate.
**There's no editorial workflow.** Optimizely Graph stays in sync with CMS content automatically. Your custom RAG service stays in sync only because you built an indexer that runs on document changes. If someone updates a document and forgets to push it, the knowledge base goes stale. This is solvable with automation, but it's a design responsibility you take on.
**You need to secure the endpoint.** Your RAG service is exposing potentially sensitive documents: compliance records, internal policies, research that hasn't been published. The Opal tool wrapper has no built-in auth beyond what you implement. At a minimum, the endpoint should require a bearer token or API key. If different user groups should see different documents, you'll also need to think about tenancy at the search layer.
**Latency.** Every query that hits your RAG tool requires an embedding call to Azure OpenAI, a database round-trip, and a return trip to Opal. On a warm connection, the embedding call alone takes 100–200ms; the PostgreSQL vector search adds another 20–50ms. Budget 300–500ms of added latency per tool call, and measure it against your UX expectations before committing to the architecture.
## Where this can go [#where-this-can-go]
The architecture described here is a foundation. A few natural extensions:
**Query expansion:** before searching, use an LLM to rewrite the user's query into multiple variations. This improves recall for queries that are too terse or use vocabulary that differs from the documents.
**Reranking:** after RRF returns the top 10 chunks, pass them through a cross-encoder reranking model that scores each chunk against the query more precisely than embedding similarity allows. This can meaningfully improve precision for complex questions.
**Multiple corpora:** the document-agnostic design means you can run multiple instances of this service against different document sets, and expose each as a separate Opal tool with a clear description of what it covers. Opal's reasoning layer will pick the right one based on the question.
**MCP for developer access:** the same service can expose an MCP (Model Context Protocol) endpoint alongside the Opal tools. This gives developers in Claude Code or Claude Desktop access to the same knowledge base, without needing to duplicate any infrastructure.
## Summary [#summary]
Optimizely Graph is a solid RAG layer for content that lives in Optimizely One. When you have valuable knowledge that doesn't belong in the CMS (and most organizations do), you can extend Opal's reach by building a custom RAG service and registering it as an Opal tool.
The key architectural decisions are: structure-aware chunking with heading hierarchy prefixes, hybrid search combining vector similarity and full-text search via RRF, and a clean separation between the RAG service and the Opal tool wrapper. None of these decisions are unique to Optimizely; they're general RAG patterns that happen to integrate cleanly with Opal's tool SDK.
The result is an Opal agent that can reason about your internal documents just as naturally as it reasons about your CMS content, without those documents ever needing to enter the CMS.
# Building AI-Powered Tools with Optimizely Opal - A Step-by-Step Guide
();
var app = builder.Build();
// Map the Opal Tools endpoints (creates /discovery and tool-specific endpoints)
app.MapOpalTools();
// Start the app
app.Run();
```
That's it for setup. The `AddOpalToolService()` registers the necessary services, and `MapOpalTools()` creates all the endpoints Opal needs to discover and call your tools.
### Creating Your First Tool [#creating-your-first-tool]
Now let's create a tool that returns adventurer details:
```csharp
using System.ComponentModel;
using Optimizely.Opal.Tools;
namespace OpalToolsTutorial.Web.RolePlayingGame;
public class AdventurerTools
{
[OpalTool(Name = "get-adventurer-details")]
[Description("Get's adventurer details based on his name")]
public object GetCharacter(AdventurerParameters parameters)
{
if (parameters.Name == "Bob")
{
return new {
name = "Bob",
race = "Human",
className = "Warrior",
level = 1,
hp = 16,
inventory = new[] { "Sword", "Shield", "Armor" }
};
}
else
{
return new {
error = "Character not found"
};
}
}
}
```
The parameter class defines what inputs your tool needs:
```csharp
using System.ComponentModel;
using System.ComponentModel.DataAnnotations;
namespace OpalToolsTutorial.Web.RolePlayingGame;
public class AdventurerParameters
{
[Required]
[Description("Name of the adventurer")]
public string Name { get; set; } = string.Empty;
}
```
A few things to note:
* The `[OpalTool]` attribute marks this as a tool and gives it a name
* The `[Description]` attribute helps Opal understand what the tool does
* Parameters use `[Required]` and `[Description]` so Opal knows what to ask for
* The method returns an object - Opal will serialize this as JSON
### Registering Your Tool in Opal [#registering-your-tool-in-opal]
Once your API is running, you need to tell Opal about it:
1. Go to your Opal instance
2. Navigate to Tools section
3. Add a new tool
4. Enter your API's discovery URL: `https://your-api-url/discovery`
Opal will automatically discover all your tools from that endpoint. For now, we're skipping the bearer token field - we'll cover authorization in Step 3.
### Creating an Opal Agent [#creating-an-opal-agent]
Now let's create an agent that can use this tool. You can import the agent configuration from the repository or create it manually:
**Agent Configuration:**
* **Name:** The Guild Master
* **Description:** An agent built to support a process of hiring adventurers for a quest in an RPG game
* **Prompt Template:**
```
# Context
You're a Guild Master and manage a guild full of adventurers.
# Requests
User may provide you with a different types of [[request]] for which you will
have to select appropriate tool and call it to fulfill a [[request]].
```
* **Parameters:**
* `request` (string, required): A request for the guild master
* **Enabled Tools:** get-adventurer-details
To quickly set this up, you can download the [guild-master-agent.json](https://github.com/michal-mitas/optimizely-opal-tools-tutorial/blob/master/guild-master-agent.json) configuration from the repository and import it directly into your Opal instance.
### Testing It Out [#testing-it-out]
Now let's see it in action. Ask your agent:
**User:** Tell me something about Bob
**Opal Response:** Bob is a Human Warrior with 16 HP. He is level 1 and his inventory includes a Sword, Shield, and Armor.
Behind the scenes, Opal:
1. Analyzed your question
2. Figured out it needed the "get-adventurer-details" tool
3. Called it with `Name: "Bob"`
4. Took the JSON response and formatted it into a natural answer
You can inspect the execution details in your Opal instance by viewing the agent execution logs, which show exactly how Opal processed the request, which tools it called, and what data was returned.
## Step 2: Multiple Tools and AI Reasoning [#step-2-multiple-tools-and-ai-reasoning]
Now let's add some complexity. We'll create a second tool and see how Opal can reason about which tools to use and when.
### Adding a New Tool [#adding-a-new-tool]
Let's add a tool that returns all available adventurers. First, we'll restructure our code to use a proper data model:
```csharp
namespace OpalToolsTutorial.Web.RolePlayingGame;
public record Adventurer
{
public required string Name { get; set; }
public required string Race { get; set; }
public required string Class { get; set; }
public required int Level { get; set; }
public required int HP { get; set; }
public required string[] Inventory { get; set; }
}
```
Now update the `AdventurerTools` class to use this model and add the new tool:
```csharp
public class AdventurerTools
{
private static readonly Dictionary Adventurers = new Dictionary
{
{ "Bob", new Adventurer { Name = "Bob", Race = "Human", Class = "Warrior", Level = 1, HP = 16, Inventory = new[] { "Sword", "Shield", "Armor" } } },
{ "Alice", new Adventurer { Name = "Alice", Race = "Elf", Class = "Mage", Level = 1, HP = 10, Inventory = new[] { "Book", "Potion", "Wand" } } },
{ "Charlie", new Adventurer { Name = "Charlie", Race = "Dwarf", Class = "Rogue", Level = 1, HP = 12, Inventory = new[] { "Dagger", "Sword", "Shield" } } },
{ "Dave", new Adventurer { Name = "Dave", Race = "Gnome", Class = "Priest", Level = 1, HP = 8, Inventory = new[] { "Book", "Potion", "Wand" } } },
{ "Eve", new Adventurer { Name = "Eve", Race = "Halfling", Class = "Rogue", Level = 1, HP = 14, Inventory = new[] { "Dagger", "Sword", "Shield" } } },
{ "Frank", new Adventurer { Name = "Frank", Race = "Orc", Class = "Warrior", Level = 1, HP = 18, Inventory = new[] { "Sword", "Shield", "Armor" } } },
{ "George", new Adventurer { Name = "George", Race = "Troll", Class = "Warrior", Level = 1, HP = 20, Inventory = new[] { "Sword", "Shield", "Armor" } } },
{ "Harry", new Adventurer { Name = "Harry", Race = "Human", Class = "Warrior", Level = 1, HP = 16, Inventory = new[] { "Sword", "Shield", "Armor" } } },
{ "Ivy", new Adventurer { Name = "Ivy", Race = "Elf", Class = "Mage", Level = 1, HP = 10, Inventory = new[] { "Book", "Potion", "Wand" } } },
};
[OpalTool(Name = "get-adventurer-details")]
[Description("Get's adventurer details based on his name")]
public object GetAdventurer(AdventurerParameters parameters)
{
if (Adventurers.ContainsKey(parameters.Name))
{
return Adventurers[parameters.Name];
}
else
{
return new {
error = "Adventurer not found"
};
}
}
[OpalTool(Name = "get-all-adventurers")]
[Description("Get's all Adventurers details")]
public object GetAllAdventurers(GetAllAdventurersParameters parameters)
{
return Adventurers.Values.ToList();
}
}
```
The new tool uses an empty parameter class since it doesn't need any inputs:
```csharp
namespace OpalToolsTutorial.Web.RolePlayingGame;
public class GetAllAdventurersParameters
{
}
```
### Updating Your Opal Agent [#updating-your-opal-agent]
Update your agent configuration to include the new tool in the "Enabled Tools" list:
* get-adventurer-details
* get-all-adventurers
### Testing Advanced Reasoning [#testing-advanced-reasoning]
Now let's see Opal's reasoning capabilities in action. Try these queries:
**User:** I'm gathering a party for a quest. Tell me about adventurers I could hire.
**Opal Response:** Here are the adventurers currently available for hire:
| Name | Class | Race | HP | Level | Inventory |
| ------- | ------- | -------- | -- | ----- | --------------------- |
| Bob | Warrior | Human | 16 | 1 | Sword, Shield, Armor |
| Alice | Mage | Elf | 10 | 1 | Book, Potion, Wand |
| Charlie | Rogue | Dwarf | 12 | 1 | Dagger, Sword, Shield |
| Dave | Priest | Gnome | 8 | 1 | Book, Potion, Wand |
| Eve | Rogue | Halfling | 14 | 1 | Dagger, Sword, Shield |
| Frank | Warrior | Orc | 18 | 1 | Sword, Shield, Armor |
| George | Warrior | Troll | 20 | 1 | Sword, Shield, Armor |
| Harry | Warrior | Human | 16 | 1 | Sword, Shield, Armor |
| Ivy | Mage | Elf | 10 | 1 | Book, Potion, Wand |
Opal automatically chose to use the `get-all-adventurers` tool and formatted the results in a nice table.
Now try something more complex:
**User:** I'm going to quest that requires some use of magical skills. Recommend me a party of 3 members that will do best on such.
**Opal Response:** For a quest requiring magical skills, I recommend the following party of 3 members:
1. Alice (Mage, Elf)
2. Ivy (Mage, Elf)
3. Dave (Priest, Gnome)
Source: Guild Adventurer Roster
This is where it gets interesting. Opal:
1. Called `get-all-adventurers` to see who's available
2. Analyzed the data to identify characters with magical abilities
3. Selected the best 3 for a magic-focused quest
4. Formatted a clear recommendation
Check your agent execution logs in Opal to see the full trace of how it processed this complex request. This demonstrates Opal's ability to not just call tools, but to reason about the data they return and provide intelligent responses.
## Step 3: Adding Authorization with OptiId [#step-3-adding-authorization-with-optiid]
So far, anyone could call our tools. But what if you want to restrict certain actions to authenticated users? This is where Opal's authorization features come in.
### Creating a Protected Tool [#creating-a-protected-tool]
Let's add a tool for hiring adventurers that requires authentication:
```csharp
[OpalTool(Name = "hire-adventurers")]
[Description("Hires adventurers and assigns them on a quest")]
[OpalAuthorization("OptiId", "cms", true)]
public object HireAdventurers(HireAdventurersParameters parameters)
{
return "Those adventurers have been hired by " + parameters.GuildClientName +
": " + string.Join(", ", parameters.AdventurerNames);
}
```
The key here is the `[OpalAuthorization]` attribute:
* `"OptiId"` - specifies we're using OptiId for authentication
* `"cms"` - the required scope
* `true` - indicates the user identity is required
The parameter class includes the user's name, which Opal will automatically provide from the authenticated user's context:
```csharp
using System.ComponentModel;
using System.ComponentModel.DataAnnotations;
namespace OpalToolsTutorial.Web.RolePlayingGame;
public class HireAdventurersParameters
{
[Required]
[Description("A list of adventurer names to be hired")]
public List AdventurerNames { get; set; } = new List();
[Required]
[Description("A name of the current Opal user making this request")]
public string GuildClientName { get; set; } = string.Empty;
}
```
### How OptiId Authorization Works [#how-optiid-authorization-works]
When Opal calls an authorized tool, it:
1. Checks if the user is authenticated
2. Verifies they have the required scope
3. Includes the authentication token in the API call
4. Passes the user's identity as a parameter
This means your tool receives information about who's making the request, allowing you to implement user-specific logic like tracking who hired which adventurers, enforcing quotas, or applying role-based permissions.
### Updating Your Opal Agent [#updating-your-opal-agent-1]
Update your agent configuration to include the new tool:
* get-adventurer-details
* get-all-adventurers
* hire-adventurers
### Testing the Authorized Tool [#testing-the-authorized-tool]
Now when you ask to hire adventurers:
**User:** I would like to hire Bob, Charlie and George for a quest.
**Opal Response:** Those adventurers have been hired by Michal Mitas: Bob, Charlie, George.
Notice that Opal automatically filled in `GuildClientName` with the authenticated user's name (in this case, "Michal Mitas"). You didn't have to specify it in your request - Opal extracted it from the user context and passed it to your tool. You can review the execution logs in your Opal instance to see how the authentication context was included in the tool call.
## Wrapping Up [#wrapping-up]
Opal Tools give you a straightforward way to extend Optimizely's AI capabilities with your own custom functionality. The SDK handles all the complexity of discovery, parameter parsing, and integration - you just focus on the business logic.
The key takeaways:
1. Tools are simple C# methods marked with attributes
2. Opal automatically discovers and understands your tools
3. AI reasoning means Opal knows when and how to combine tools
4. Authorization is built-in and easy to configure
The full source code for this tutorial is available at [https://github.com/michal-mitas/optimizely-opal-tools-tutorial](https://github.com/michal-mitas/optimizely-opal-tools-tutorial), with each step in its own branch so you can see exactly what changes at each stage.
If you build something cool with Opal Tools, I'd love to hear about it. Feel free to reach out or share your experiences in the Optimizely community.
Happy coding!
# Common Pitfalls with Search in Optimizely Graph - and How to Avoid Them
## Introduction [#introduction]
Optimizely Graph offers powerful, flexible search capabilities out of the box, making it a popular choice for headless implementations. However, like any robust system, it comes with nuances that can trip you up if you're not careful.
In this post, I'll try to cover **common pitfalls developers may encounter when working with search in Optimizely Graph**, especially around content duplication, unintentional exposure, and content provider handling - and show you how to avoid them.
## Duplicate Content in Search Results [#duplicate-content-in-search-results]
One of the most frustrating issues is seeing the **same content item indexed multiple times** or search results returning unexpected duplicates.
### Incorrect Authentication Mode [#incorrect-authentication-mode]
Optimizely Graph exposes not only the published versions of your content but also includes **drafts and other unpublished versions**. This is particularly useful for building custom on-page editing experiences in headless setups. However, it also introduces a potential risk: **unpublished content may unintentionally appear in search results** if access controls are not correctly configured.
**Recommended Solution**
To mitigate this, it's crucial to separate authentication modes between editing and search functionalities:
* On-page editing should use authenticated access to retrieve drafts and work-in-progress content.
* Public search should be limited strictly to published content and operate under a separate, read-only context.
* Reusing tokens or authentication flows between these use cases should be strictly avoided.
This may also be a potential security concern if not handled properly - but that's a topic worthy of a separate article.
For implementation guidance and best practices, refer to the official documentation: [Authentication – Optimizely Graph](https://docs.developers.optimizely.com/graph/docs/authentication).
### Shortcut Pages Misindexed [#shortcut-pages-misindexed]
In Optimizely CMS, pages using **Shortcuts** (e.g., "Fetch content from another page", see [documentation](https://docs.developers.optimizely.com/content-management-system/docs/shortcuts)) are **by default indexed as standalone pages**, even though they point to other content. This behavior can result in **unexpected duplicate entries** in your search results, which may negatively affect content relevance and SEO.
**Recommended Solution**
To prevent this, it's important to **filter out shortcut pages** at the query level during indexing or search execution.
A more robust and maintainable solution is to:
* Introduce a custom property like `ExcludeFromSearch` (boolean).
* Automatically set this property to `true` for shortcut pages (e.g., in content events).
* Respect this property in your search queries by excluding any pages where **`ExcludeFromSearch == true`**.
This approach not only handles shortcut pages gracefully but also gives editors fine-grained control over which pages should be searchable.
## Exposing Technical Content That Shouldn't Be Indexed [#exposing-technical-content-that-shouldnt-be-indexed]
It's not uncommon for **non-public content** - such as settings pages, container pages, or system-level content - to inadvertently appear in Graph search results. These items were never intended to be publicly accessible and can clutter search experiences or expose internal information.
### Common Causes [#common-causes]
* Missing exclusion flags on special or restricted content.
* Lack of visibility review during the Graph schema setup.
* Overly broad queries that don't filter by content purpose or type.
### How to Prevent It [#how-to-prevent-it]
Use Graph filters to explicitly exclude:
* Content in designated folders (e.g. **`/settings`**, **`/utility`**)
* Content with a flag like `ExcludeFromSearch = true`
* Specific content types not meant for search (e.g. **`SiteSettingsPage`**, **`RedirectPage`**)
**Best Practice**
Implement an `ExcludeFromSearch` property on all content types. This offers **low coupling** between search logic and CMS structure, and allows editors or developers to easily manage visibility without tightly binding filtering rules to folder paths or content type checks.
## Multilingual Content in Optimizely Graph [#multilingual-content-in-optimizely-graph]
In most cases, our content exists in multiple languages. However, a basic language filter in a Graph query may unintentionally exclude content that lacks a translation in the currently selected site language.
**Example Scenario:**
* A user is browsing the site in German ("de").
* The CMS has a fallback language set to English ("en").
* Some product pages have not yet been translated into German.
A basic Graph filter like `Language: { Name: { eq: "de" } }` will exclude these untranslated pages, even if fields like the product name are language-agnostic and would otherwise match the search criteria.
**Why This Matters:**
Depending on your business needs, showing fallback content might be acceptable or preferred. However, even if you choose not to display it, it's important to make that decision consciously, not by default behavior.
**Recommended Approach:**
To support fallback languages in search results, leverage the following Graph fields:
* `MasterLanguage`: Indicates the original language of the content.
* `ExistingLanguages`: Lists all languages the content has been translated into.
By using these properties, you can intelligently include fallback content in queries - ensuring a better user experience while respecting localization strategy.
## Poor Relevance and Ranking in Search Results [#poor-relevance-and-ranking-in-search-results]
Even with a clean index and a well-designed Graph schema, search results can appear **noisy, irrelevant, or misleading** if queries aren't thoughtfully constructed. Common issues like **missing field boosting, unfiltered related content**, and **generic query logic** can cause even high-quality content to be buried beneath less relevant matches.
### Missing Field Boosting [#missing-field-boosting]
By default, all fields are treated equally in Optimizely Graph unless explicitly boosted. This often leads to situations where low-priority fields (e.g., descriptions) match as strongly as high-priority ones (e.g., titles or product names).
**Recommendation:**
Use field-level boosting to give higher weight to meaningful fields like title, name, or tags. Learn more: [Boosting in Optimizely Graph](https://docs.developers.optimizely.com/graph/docs/boosting).
### Unintended Indexing of Related Content [#unintended-indexing-of-related-content]
Product pages or articles often embed **related content** (e.g., "Related Products" blocks or references). If this content is indexed directly with the main page, it can **bleed into the searchable content** of the parent - leading to **false positives**, confusing matches, and degraded search relevance.
**Example:**
A product page for a wireless mouse might appear in search results for a mechanical keyboard if a related keyboard product is embedded and indexed as part of the same content.
**Recommendation:**
Ensure related items are either:
* **Excluded from the index**, or
* **Indexed separately and referenced cleanly**, rather than merged into the searchable body of the main item.
## Access-Controlled Content Leaking into Public Search [#access-controlled-content-leaking-into-public-search]
In many CMS implementations, certain content such as **gated resources, subscriber-only pages**, or **internal documentation** should only be accessible to specific user groups. A **critical security risk** occurs when this restricted content unintentionally appears in **public search results**, exposing sensitive or paid information to unauthorized users.
### Common Cause [#common-cause]
**Incorrect authentication mode** used when querying Optimizely Graph, resulting in unrestricted access to protected content.
### How to Prevent It [#how-to-prevent-it-1]
To ensure proper access control:
* When authenticating to Optimizely Graph, always include the **current user context** and their **roles/permissions**.
* Avoid using system-wide tokens or anonymous access for features that should reflect user-level content restrictions.
Optimizely Graph enforces access control only when explicitly requested via authenticated queries. If omitted, all content - including restricted items - may be returned.
[How to retrieve restricted content securely (Optimizely Docs)](https://docs.developers.optimizely.com/graph/docs/access-control)
## Final Thoughts [#final-thoughts]
Optimizely Graph is a powerful tool but like any flexible system, it needs intentional setup and governance to avoid messy search results and content exposure issues.
By being aware of the common pitfalls and applying proactive filters, schema hygiene, and provider discipline, you'll set yourself (and your editors!) up for a clean, accurate, and efficient search experience.
Have you run into a tricky Graph issue in production? Let me know - always keen to learn how others are solving these challenges.
# Going Headless - 3 Ways to Store Custom Data in Optimizely Graph
Welcome to another installment of my *Going Headless* series. Previously, we covered:
* [Going Headless: Making the Right Architectural Choices](/blog/architecture-overview)
* [Going Headless: On-Page Editing with Optimizely Graph and Next.js](/blog/on-page-editing)
* [Going Headless: Optimizely Graph vs Content Delivery API](/blog/graph-vs-cda)
So far, we've talked about architectural decisions, on-page editing, and how Optimizely Graph compares to other APIs.\
Today, we'll take the next step and look at **how to store and expose your custom data in Optimizely Graph** — data that doesn't necessarily come directly from CMS properties.
This article walks through **three different approaches**:
1. **Using the Conventions API**
2. **Creating a custom `IContentApiModelProperty` implementation**
3. **Using the Graph Source SDK**
Each method offers a different level of control, flexibility, and effort. Let's dive in.
## 1. Using the Conventions API [#1-using-the-conventions-api]
The first and most straightforward method for influencing how your data is indexed in Optimizely Graph is through the **Conventions API**. This API allows developers to modify or extend how CMS content is represented when it's sent to the indexing pipeline. In other words, before your content gets published to Graph, the Conventions API gives you a hook to reshape or enrich the data.
### When to use it [#when-to-use-it]
If you only need to:
* Exclude specific properties or content types,
* Include some custom fields,
* Add some lightweight metadata derived from existing content properties
…then the Conventions API is your best friend.
### Example: [#example]
Let's say you have a `LandingPage` and `InternalSettingsPage` content types:
```csharp title="InternalSettingsPage.cs"
[ContentType(DisplayName = "Internal Settings Page")]
public class InternalSettingsPage : SitePageData
{
[Display(
Name = "Some Internal Setting",
Description = "A confidential value / setting that should not be published in Graph")]
public virtual string? SomeInternalSetting { get; set; }
}
```
```csharp title="LandingPage.cs"
using EPiServer.Core;
using EPiServer.DataAnnotations;
using System.ComponentModel.DataAnnotations;
[ContentType(DisplayName = "Landing Page")]
public class LandingPage : SitePageData
{
[Display(
Name = "Secret Property",
Description = "A confidential value not published in Graph")]
public virtual string? SecretProperty { get; set; }
[Display(
Name = "Title Prefix",
Description = "Prefix for the page title")]
public virtual string? TitlePrefix { get; set; }
[Display(
Name = "Title",
Description = "The main page title")]
public virtual string? Title { get; set; }
public virtual string PageTitle()
{
return TitlePrefix + " " + Title;
}
}
```
For these content types you want to:
* Exclude `InternalSettingsPage` content type from being indexed to Graph
* Exclude the `SecretProperty` to prevent it from leaking into Graph, and
* Include custom `PageTitle` property (being a mix of TitlePrefix and Title properties) in the Graph index
You can do it with a simple convention registration:
```csharp title="GraphConventions.cs"
using EPiServer.Framework;
using EPiServer.Framework.Initialization;
using EPiServer.ServiceLocation;
using Optimizely.ContentGraph.Cms.NetCore.ConventionsApi;
[ModuleDependency(typeof(EPiServer.Web.InitializationModule))]
public class GraphConventions : IInitializableModule
{
public void Initialize(InitializationEngine context)
{
var conventionRepository = context.Locate.Advanced.GetInstance();
conventionRepository.ExcludeContentType();
conventionRepository.ForInstancesOf()
.ExcludeField(x => x.SecretProperty);
conventionRepository.ForInstancesOf()
.IncludeField(x => x.PageTitle());
}
public void Uninitialize(InitializationEngine context) { }
}
```
Once this convention is registered, Optimizely will skip excluded content types and apply defined adjustments whenever a `LandingPage` is serialized for indexing in Graph.
## 2. Creating a Custom `IContentApiModelProperty` [#2-creating-a-custom-icontentapimodelproperty]
Sometimes conventions alone aren't enough.\
Maybe you want to inject **dynamic data** that doesn't exist in CMS at all — data coming from another service, or a calculated value that depends on runtime conditions.
That's when `IContentApiModelProperty` comes into play.
### What it does [#what-it-does]
`IContentApiModelProperty` allows you to define **a new property** that will be available for all content items (or selected ones) when indexed in Optimizely Graph.\
You can think of it as a plug-in point for adding custom, computed, or external data to the Graph model.
### Example: Adding a custom property [#example-adding-a-custom-property]
Here's a simple implementation:
```csharp
using Optimizely.ContentGraph.Cms.Core.ContentApiModelProperties;
public sealed class CustomApiModelProperty : IContentApiModelProperty
{
private readonly IContentLoader _contentLoader;
public CustomApiModelProperty(IContentLoader contentLoader)
{
_contentLoader = contentLoader;
}
public string Name => "CustomPropertyName";
public object GetValue(ContentApiModel contentApiModel)
{
// Example: Load the content and derive a value dynamically
if (_contentLoader.TryGet(
new ContentReference(contentApiModel.ContentLink.Id ?? 0),
out SitePageData page))
{
return $"calculated-value-for-{page.Name}";
}
return null;
}
}
```
When this property is registered, **every content item** sent to Optimizely Graph will include an additional field called `CustomPropertyName`, with whatever value you return from `GetValue()`.
For example, the Graph output might look like this:
```json
{
"name": "About Us",
"customPropertyName": "calculated-value-for-About Us"
}
```
### Practical uses [#practical-uses]
* Injecting content from external APIs (for example, pulling stock data for product pages)
* Calculating derived values (e.g., reading time, rating averages)
* Adding environment or contextual metadata
## 3. Using the Graph Source SDK [#3-using-the-graph-source-sdk]
The last approach is the most flexible — and the most decoupled from CMS.\
If you have data **completely external** to the CMS (e.g., from a CRM, ERP, or a custom database), you can use the **Optimizely Graph Source SDK** to push it directly into Graph.
The SDK gives you full control over what and how you publish to Optimizely Graph, allowing you to create **custom schemas** and **populate data manually**.
### When to use it [#when-to-use-it-1]
Use the SDK when:
* You need to index non-CMS data (e.g., product catalogs, events, user profiles)
* You want to synchronize third-party data sources with Graph
* You're building a headless architecture where CMS is just one of multiple content sources
### Example: Pushing external data [#example-pushing-external-data]
Here's a simplified example based on the [Graph Source SDK on GitHub](https://github.com/episerver/graph-source-sdk):
```csharp
using Optimizely.Graph.Source.Sdk;
using Optimizely.Graph.Source.Sdk.SourceConfiguration;
public class ExternalProduct
{
public string? Id { get; set; }
public string? Name { get; set; }
public double Price { get; set; }
}
// Initialize the GraphSourceClient by calling the Create method
var source = "custom-source";
var appKey = "your-app-key";
var secret = "your-secret";
// Initialize the GraphSourceClient by calling the Create method
var client = GraphSourceClient.Create(new Uri("https://cg.optimizely.com"), source, appKey, secret);
// Add a language preference
client.AddLanguage("en");
// Configure content type for ExternalProduct
client.ConfigureContentType()
.Field(x => x.Id, IndexingType.Searchable)
.Field(x => x.Name, IndexingType.Searchable)
.Field(x => x.Price, IndexingType.Queryable);
// Save content types to Optimizely Graph
client.SaveTypesAsync();
// Instantiate and assign values for ExternalProduct
var product = new ExternalProduct
{
Id = "SKU-001",
Name = "Custom Running Shoes",
Price = 129.99,
};
// Use the client to sync the product
client.SaveContentAsync(generateId: (x) => x.Id, "en", product);
```
This code defines a custom schema (`ExternalProduct`) and publishes it to Optimizely Graph.\
Once indexed, you can query your data directly through GraphQL — just like CMS content.
**Important note about Optimizely Graph sources:**\
In the code above, we specified the source as `custom-source`, but you may choose any name to logically separate your data sources. Each *source* acts as its own container in Optimizely Graph.
By default, CMS content is stored in the `default` source. If you were to use `default` as the source when pushing custom types, you risk overwriting your entire Graph schema for that source. This is because calling `client.SaveTypesAsync()` replaces all content types in the target source with only those specified by `ConfigureContentType`.
To avoid disrupting your CMS data and schema, always register external data under a separate source name (such as `custom-source`). This keeps your external types isolated and safe from unintended changes.
### Example query [#example-query]
```graphql
query CustomQuery {
ExternalProduct {
items {
Id
Name
Price
}
}
}
```
And you'll get:
```json
{
"data": {
"ExternalProduct": {
"items": [
{
"Id": "SKU-001",
"Name": "Custom Running Shoes",
"Price": 129.99
}
]
}
},
"extensions": {
"correlationId": "998b0a360df95906",
"cost": 23,
"costSummary": [
"ExternalProduct(23) = limit(20) + 3*fields(1)"
]
}
}
```
### Key takeaway [#key-takeaway]
Use the Graph Source SDK when:
* Your data lives outside CMS,
* You want total control over schemas,
* You're integrating Graph as part of a larger headless ecosystem.
It's the most advanced option — but it also opens up the most possibilities.
***
## Wrapping Up [#wrapping-up]
In a headless setup, **Optimizely Graph** becomes much more than a content delivery layer.\
It can act as a **centralized data hub** — combining CMS content, computed properties, and external datasets under one unified GraphQL API.
To recap:
| Approach | Best for | Level of Effort | Notes |
| ---------------------------- | ---------------------------------- | --------------- | --------------------------------------------------------- |
| **Conventions API** | Shaping existing CMS data | 🟢 Low | Ideal for renaming, excluding, or slightly enriching data |
| **IContentApiModelProperty** | Injecting dynamic or computed data | 🟠 Medium | Great for adding calculated or external fields |
| **Graph Source SDK** | Indexing non-CMS data sources | 🔴 High | Full control over schema and indexing |
Choosing the right approach depends on your architectural goals — and how “headless” you really want to go.
In most projects, a combination works best:
* Use **Conventions** for quick tweaks,
* Add **custom properties** for dynamic logic, and
* Extend with the **SDK** when you need full control.
***
That's it for this installment of *Going Headless*!\
In the next part, we'll look at how to query your combined datasets efficiently — and how to design your schema for real-world performance.
***
### Further Reading [#further-reading]
* [Optimizely Graph Documentation](https://docs.developers.optimizely.com/graph/docs)
* [Conventions API Reference](https://docs.developers.optimizely.com/content-management-system/docs/conventions-api)
* [Graph Source SDK on GitHub](https://github.com/episerver/graph-source-sdk)
* [Going Headless: Making the Right Architectural Choices](https://world.optimizely.com/blogs/micha-mitas/dates/2025/10/going-headless-making-the-right-architectural-choices/)
* [Going Headless: Optimizely Graph vs Content Delivery API](https://world.optimizely.com/blogs/micha-mitas/dates/2025/4/going-headless-optimizely-graph-vs-content-delivery-api/)
# Going Headless - Making the Right Architectural Choices
## Introduction [#introduction]
Earlier this year, I began a series of articles about headless architecture:
* [Going Headless: Optimizely Graph vs Content Delivery API](/blog/graph-vs-cda)
* [Going Headless: On-Page Editing with Optimizely Graph and Next.js](/blog/on-page-editing)
Today's post continues that series. Having just completed the launch of a new website built with a headless architecture, I'd like to share key observations, strategic considerations, and my own perspective on the strengths and challenges of the headless model. My goal is to help you make confident, informed choices for your own future project architecture.
## What This Article Covers [#what-this-article-covers]
In today's post, we'll start with the fundamentals:
* What “headless” really means in the Optimizely context
* Why some choose it (and why some shouldn't)
* Choosing the right architecture for your headless Optimizely setup
* A high-level architecture overview to ground future discussions
## What “Headless” Means in the Optimizely World [#what-headless-means-in-the-optimizely-world]
In a headless Optimizely setup, the CMS focuses on storing and structuring content and exposing it via APIs. Whether you use a [Content Delivery API or Optimizely Graph](/blog/graph-vs-cda), the “head” (the UI) is a separate app that fetches the content and renders it.
## When Headless Might Not Be the Right Choice [#when-headless-might-not-be-the-right-choice]
The headless separation lets the front-end team ship without touching the CMS, and enables you to serve multiple channels from a single content source. While this flexibility is appealing, headless isn't always the right fit for every scenario.
**When headless may not be necessary:**
* **Simple site needs**: If you only require a basic site, headless can introduce unnecessary complexity.
* **Limited developer capacity**: Headless architectures require a skilled front-end team comfortable with API-driven development.
* **Budget constraints**: Having two applications means you need to host two applications. This can impact your infrastructure or require additional licences and potentially higher costs.
**Key challenges of going headless:**
* **Routing and URL management**: You are responsible for route generation and resolution (slugs, dynamic routes, canonical URLs, redirects, and localization-aware paths). With Optimizely Graph, there's no built-in URL resolver, so you must design and maintain this logic on the front end.
* **On-page editing and preview**: Traditional on-page editing from MVC is not available by default. You'll need to implement preview rendering of drafts, signed preview tokens, and live refresh hooks. If editors require a visual page preview, you'll have to build or integrate that experience. As a starting point you can follow my guide - [Going Headless: On-Page Editing with Optimizely Graph and Next.js](https://world.optimizely.com/blogs/micha-mitas/dates/2025/9/draft/)
* **CI/CD complexity**: Headless usually means separate pipelines for the CMS and front end, so you need to coordinate deployments and keep everything in sync. Additionally, managing schema changes in Optimizely Graph introduces further challenges, as updates must be reflected and tested across both applications.
* **Authentication and authorization**: You'll need to handle user logins, editor previews, and protect your APIs. This means managing secrets and reviewing security.
As you can see, adopting a headless approach involves trade-offs and added complexity. Make sure your decision is guided by genuine business requirements, rather than simply following industry trends.
## When Headless Is a Way To Go [#when-headless-is-a-way-to-go]
Opting for a headless architecture can be a game changer for organizations that need agility, omnichannel delivery, and modern development workflows. If your content needs to be reused across multiple front ends—such as websites, mobile apps, IoT devices, or digital kiosks — headless streamlines the process and reduces duplication. It enables independent development and deployment of the frontend and backend, letting teams iterate quickly and select best-in-class technologies for each layer. For companies with demanding editorial workloads, headless can provide enhanced flexibility, customizable authoring experiences, and the ability to scale globally by leveraging CDN-backed static sites or API-first delivery. If you need powerful integrations, advanced personalization, or the latest in frontend performance tooling, headless often opens more doors than traditional approaches. Ultimately, headless is especially valuable when your project requires future-proofing, composability, and the freedom to evolve both your frontend and backend at their own pace.
## Choosing the Right Architecture for Your Headless Optimizely [#choosing-the-right-architecture-for-your-headless-optimizely]
When picking your setup, balance short-term delivery with long-term flexibility. Consider who you're building for, which channels you must support, your team's skills, latency/scale needs, security/compliance, and total cost of ownership. Write these down up front-they'll keep trade-offs honest.
# Technical decisions [#technical-decisions]
These days, the variety of tools and architectural options can feel overwhelming, so it's impossible to cover every scenario here. Instead, I'll highlight some key decisions I've faced recently and briefly explain each. Hopefully, these insights will be helpful.
### CMS PaaS vs SaaS [#cms-paas-vs-saas]
PaaS offers greater control over your codebase and infrastructure, but comes with increased operational responsibilities. SaaS minimizes maintenance and accelerates upgrades, though it restricts server-side customization and hosting flexibility. Your choice should depend on your need for custom server logic and regional deployment control. For our project, we selected PaaS to retain full control over our source code and to support future integrations.
### Optimizely DXP vs self-hosted [#optimizely-dxp-vs-self-hosted]
DXP gives you managed hosting, a global CDN, built-in security, and guaranteed SLAs right from the start. So a lot of the heavy lifting is taken care of for you. On the other hand, self-hosting might be the way to go if you have strict data residency requirements or unique networking needs, but just keep in mind that you'll be responsible for monitoring, scaling, patching, and handling any incidents yourself. Be sure to realistically weigh the operational costs of each option before making your choice.
### Graph (GraphQL) vs CDA (Content Delivery API) [#graph-graphql-vs-cda-content-delivery-api]
Optimizely Graph shifts content delivery to a managed service, enabling precise GraphQL queries-ideal for retrieving deeply nested or specific content-and offers advanced search capabilities. In contrast, the Content Delivery API (CDA) is simpler, REST-based, and provides built-in URL resolution, but may require additional effort for complex content structures or scaling needs. For a detailed comparison, see my article: [Going Headless: Optimizely Graph vs Content Delivery API](https://world.optimizely.com/blogs/micha-mitas/dates/2025/4/going-headless-optimizely-graph-vs-content-delivery-api/).
For our project, we chosed Optimizely Graph because its data residency met our requirements and it provided greater flexibility for content delivery.
### Next.js vs other front-end frameworks [#nextjs-vs-other-front-end-frameworks]
Next.js offers SSR, SSG, and ISR out of the box, making it a strong choice for content-rich sites. Alternatives like React with Vite or Angular are also solid. Choose the framework your team is most comfortable with and that aligns with your hosting environment (Node, Edge, or serverless).
For our project, rapid time to market was essential. We selected Next.js together with Vercel for its seamless support of SSR/SSG/ISR, integrated Turbo monorepo tooling, and a deployment workflow that enabled us to iterate quickly, gather feedback, and launch efficiently.
If you're using the SaaS version of Optimizely CMS, you may want to explore the newly introduced DXP hosting for front-end applications. Learn more in the official documentation: [https://docs.developers.optimizely.com/content-management-system/v1.0.0-CMS-SaaS/docs/host-a-front-end-with-optimizely](https://docs.developers.optimizely.com/content-management-system/v1.0.0-CMS-SaaS/docs/host-a-front-end-with-optimizely)
### GitHub vs Azure DevOps [#github-vs-azure-devops]
Pick the platform your team knows and that fits your cloud targets. GitHub pairs nicely with Actions and Vercel; Azure DevOps integrates tightly with Azure and enterprise governance. Both support trunk-based development, protected branches, and good CI/CD.
We chose GitHub because we didn't need the additional features offered by Azure DevOps, and hosting our app in DXP meant Azure integrations were minimal. GitHub's seamless integration with Vercel was also a significant advantage for our workflow.
### Opti ID vs other SSO providers [#opti-id-vs-other-sso-providers]
Use Opti ID where it makes sense within the Optimizely ecosystem. For your site/app users and internal editors, standard OpenID Connect/SAML providers (Azure AD, Okta, Auth0, etc.) work well. Confirm MFA, provisioning, and claim mapping early.
We selected Opti ID because it met all our requirements and enabled us to implement authentication quickly and efficiently. For more details, refer to the official documentation: [https://support.optimizely.com/hc/en-us/articles/12613241464461-Get-started-with-Opti-ID](https://support.optimizely.com/hc/en-us/articles/12613241464461-Get-started-with-Opti-ID)
### Common Repository vs Separate Repositories [#common-repository-vs-separate-repositories]
In a headless setup, the frontend and the CMS/backend are independent. You can keep them in one repository (monorepo) or split them into separate repositories.
* Monorepo (one repository):
* Pros: single place for code and tooling, atomic changes across front end and CMS, easier end-to-end testing and shared packages
* Cons: more complex pipelines, risk of unnecessary deploys without proper path filters, larger repo to maintain
* Separate repositories:
* Pros: clear ownership and access control, simpler pipelines per app, easier to replace one part without touching the other
* Cons: coordination overhead (shared contracts, schemas, SDK versions), more cross-repo communication
Opt for a single repository when teams need to collaborate closely, share code, or coordinate changes across frontend and backend. Separate repositories are preferable when independent deployments and isolated responsibilities are a priority.
We chose a monorepo approach because our team size makes close collaboration easier, and it gives us greater control and visibility over the entire CI/CD process.
# Summary [#summary]
In summary, successful modern web architecture is about making the right choices for your team, business needs, and long-term maintainability. Each architectural decision, whether it's PaaS vs SaaS, managed services vs custom hosting, or selecting the front-end framework should reflect your unique requirements in performance, scalability, flexibility, and collaboration. By evaluating trade-offs at each level and prioritizing seamless integration, you can build solutions that are robust, adaptable, and future-proof.
# Going Headless - On-Page Editing with Optimizely Graph and Next.js
## Introduction [#introduction]
On-page editing is one of the standout features of Optimizely CMS, giving editors the power to update content directly on the site as they see it. But when you move to a headless architecture, bringing that seamless editing experience to your custom frontend can seem daunting. The good news? It's absolutely possible and not as complicated as you might think!
In this article, I'll walk you through how to enable on-page editing in your own solution using Next.js, so your editors can enjoy the best of both worlds: modern headless flexibility and intuitive in-context editing.
## How does On-Page Editing work in a headless setup? [#how-does-on-page-editing-work-in-a-headless-setup]
(options => options.OptimizeForDelivery = true)
return serviceCollection;
}
public static IApplicationBuilder AddCorsForFrontendApp(this IApplicationBuilder app, string? frontendUri)
{
if (!string.IsNullOrWhiteSpace(frontendUri))
{
app.UseCors(b => b
.WithOrigins($"{frontendUri}", "*")
.WithExposedContentDeliveryApiHeaders()
.WithHeaders("Authorization")
.AllowAnyMethod()
.AllowCredentials());
}
return app;
}
public static IApplicationBuilder AddRedirectToCms(this IApplicationBuilder app)
{
// Since it's a headless setup we can redirect user from "/" directly to CMS
app.UseStatusCodePages(context =>
{
if (context.HttpContext.Response.HasStarted == false &&
context.HttpContext.Response.StatusCode == StatusCodes.Status404NotFound &&
context.HttpContext.Request.Path == "/")
{
context.HttpContext.Response.Redirect("/episerver/cms");
// or /ui/cms if you use OptiID or have changed path to your CMS
//context.HttpContext.Response.Redirect("/ui/cms")
}
return Task.CompletedTask;
});
return app;
}
}
```
Now use this extension in `Startup.cs`:
```csharp title="Startup.cs"
public class Startup
{
private readonly IWebHostEnvironment _webHostingEnvironment;
private readonly IConfiguration _configuration;
private readonly string? _frontendUri;
public Startup(IWebHostEnvironment webHostingEnvironment, IConfiguration configuration)
{
// ...
_frontendUri = _configuration.GetValue("Headless:FrontEndUri");
}
public void ConfigureServices(IServiceCollection services)
{
// ...
services.AddHeadlessOnPageEditing();
}
public void Configure(IApplicationBuilder app, IWebHostEnvironment env)
{
// ...
app.AddCorsForFrontendApp(_frontendUri);
app.AddRedirectToCms();
}
}
```
Neat and clean. Next, enable the frontend to be loaded in an iframe. Add an environment variable:
```bash title=".env.local"
NEXT_PUBLIC_CMS_URL="https://localhost:5096"
```
and use it in the Next.js config:
```js title="next.config.mjs"
async headers() {
return [
{
source: '/:path*',
headers: [
{ key: 'X-Frame-Options', value: 'SAMEORIGIN' },
{
key: 'Content-Security-Policy',
value: `frame-ancestors 'self' ${process.env.NEXT_PUBLIC_CMS_URL || 'localhost:5096'}`,
},
],
},
]
},
```
Finally, go to "Manage Websites" and define hosts for both the CMS and the frontend apps. Set this up correctly or the CMS won't be able to display previews from a different host.
In example below:
* CMS app: [https://localhost:5096/](https://localhost:5096/)
* Frontend client: [https://localhost:3000/](https://localhost:3000/)
Run both CMS and frontend on the same protocol, preferably HTTPS. Otherwise the CMS won't load the iframe.
If you're using OptiID or changed the CMS URL, you might need to replace `episerver` with `ui` or another prefix.
Now all requests to `/episerver/CMS/Content/*` and `/episerver/CMS/contentassets/*` will be redirected to our draft API route. Here we need to:
* Enable draft mode by calling `(await draftMode()).enable()`. This allows bypassing static generation and rendering on-demand at request time
* Extract parameters from URL
* Redirect to a draft (for page or block) and pass extracted parameters
```ts title="src/app/api/draft/[...slug]/route.ts"
import { redirect, notFound } from 'next/navigation';
import { NextRequest } from 'next/server';
import { draftMode } from 'next/headers'
export async function GET(request: NextRequest) {
const url = new URL(request.url);
const { searchParams, pathname } = url;
// There are 2 different type of URLs to handle here...
// For Page:
// /api/draft/en/,,5_8?epieditmode=true
// For Blocks:
// /api/draft/contentassets/en/77364cdc2802407b8b8cae45b65bc16e/,,7_10?epieditmode=true
// To get the value of a search param, use .get('')
const epiEditMode = searchParams.get('epieditmode');
// Remove leading '/api/draft/' from pathname
let path = pathname.replace(/^\/api\/draft\//, '');
// Assess type of content
const isBlock = path.startsWith('contentassets');
path = isBlock ? path.replace("contentassets/", "") : path;
// Extract locale + ids (Optimizely-specific pattern: /en/,,5_8)
const segments = path.split("/");
const locale = segments[0] || "en";
const idsPart = segments[segments.length - 1] || "";
const [, ids = ""] = idsPart.split(",,");
const [id = "0", workId = "0"] = ids.split("_");
// Validate all required fields
if (!locale || !id || !workId || !epiEditMode) {
return notFound();
}
// Enable draft mode
(await draftMode()).enable()
const newSearchParams = new URLSearchParams({
locale,
id,
workId,
epiEditMode,
});
const newUrl = isBlock
? `/draft/block?${newSearchParams.toString()}`
: `/draft?${newSearchParams.toString()}`;
redirect(`${newUrl}`);
}
```
## Step 3: Include the communicationinjector.js script [#step-3-include-the-communicationinjectorjs-script]
To enable seamless communication between your draft site and the CMS for on-page editing, you must add the `communicationinjector.js` script to your draft layout. This script, served from your CMS instance, is required for listening to content save events and enabling real-time editing capabilities.
Include it in your layout file:
```html title="src/app/draft/layout.tsx"
```
## Step 4: Display the draft for a page. [#step-4-display-the-draft-for-a-page]
A key aspect is the `data-epi-edit` attribute, which tells Optimizely which field is editable on the page. In the example above, we set its value to `"title"`, matching the property name in the CMS.
```tsx title="src/app/draft/page.tsx"
import { renderBlocks } from '@repo/helpers';
import { draftMode } from 'next/headers';
import { notFound } from 'next/navigation';
import * as blockComponents from '~/blocks';
import { getPageContentById } from '~/cms/helpers';
import OnPageEdit from '~/components/draft/OnPageEdit';
import type { AllBlocks } from '~/types';
import type { OptiPreviewPageProps } from '~/types-legacy';
// Ensure this page is always rendered on-demand and never statically cached
export const revalidate = 0;
export const dynamic = 'force-dynamic';
export default async function PreviewPage({
searchParams,
}: OptiPreviewPageProps) {
const { isEnabled: isDraftModeEnabled } = await draftMode();
if (!isDraftModeEnabled) {
return notFound();
}
// Fetch the page content in draft mode using the provided search parameters
const page = await getPageContentById({
id: searchParams.id,
workId: searchParams.workId,
locale: searchParams.locale,
preview: true,
});
if (!page) return notFound();
return (
<>
{page.title} }
{renderBlocks
(page.blocks, blockComponents, {
showDataOnMissingBlock: true,
arbitraryData: { searchParams },
weave: ['backgroundColor'],
})}
;
}
interface OnPageEditProps {
workId: string;
currentRoute: string;
}
// This component listens for changes made in the Optimizely CMS editor and updates the preview of a page or block accordingly.
// When a change is made in the CMS, Optimizely emits a "contentSaved" event via the communicationinjector.js script.
// The event includes a list of updated properties. For significant changes, Optimizely may increment the workId of the edited content,
// returning the new workId as part of the content URL in the "contentSaved" event.
const OnPageEdit = ({
workId,
currentRoute,
}: OnPageEditProps) => {
const router = useRouter();
// Listen for "contentSaved" events from the CMS editor, which may fire multiple times per change.
// To avoid processing duplicate events, keep track of the last handled event and only process new ones.
const prevMessageRef = useRef(null);
useEffect(() => {
// Handle content saved events from Optimizely CMS
const handleContentSaved = (event: any) => {
const message = event as ContentSavedEventArgs;
// Check if the event is a duplicate
const prevMessage = prevMessageRef.current;
if (
prevMessage &&
JSON.stringify(prevMessage) === JSON.stringify(message)
) {
// Skip the event
return;
}
prevMessageRef.current = message;
// Since Optimizely Graph is external service, it may take some time to propagate the changes.
// That's why simple "refresh" is not sufficient to provide seamless editing experience.
// We need to look inside "contentSaved" event and update the DOM with the new content.
message.properties?.forEach((prop) => {
if (!prop.successful) return;
// Find matching elements in the DOM
const elements = document.querySelectorAll(
`[data-epi-edit="${prop.name}"]`,
);
elements.forEach((el) => {
// Skip elements inside content areas that are marked as "is-on-page-editing-block-container"
if (el.closest('[is-on-page-editing-block-container]')) {
return;
}
// Replace text content
el.textContent = prop.value;
});
});
// When a major content change occurs, Optimizely increments the workId and provides a new draft URL.
// If the workId has changed, update the URL to fetch the latest draft content from Graph.
// Extract the new workId from the contentLink (format: "id_workId").
const [, newWorkId] = message?.contentLink?.split('_');
if (newWorkId && newWorkId !== workId) {
const newUrl = currentRoute?.replace(
`workId=${workId}`,
`workId=${newWorkId}`,
);
router.push(newUrl);
}
};
// -----------------------------------------------
// Subscribe for Optimizely CMS events
// -----------------------------------------------
// Next.js pages are first server-rendered and then hydrated on the client.
// window.epi (Optimizely API) may not exist immediately on hydration,
// so we poll every 500ms until it becomes available.
let interval: NodeJS.Timeout;
const trySubscribe = () => {
const win = window as WindowWithEpi;
if (win.epi) {
win.epi.subscribe('contentSaved', handleContentSaved);
clearInterval(interval); // Stop polling once subscribed
}
};
interval = setInterval(trySubscribe, 500);
trySubscribe(); // try immediately too
// -----------------------------------------------
// Cleanup
// -----------------------------------------------
// Avoid duplicate subscriptions or memory leaks
return () => {
clearInterval(interval);
const win = window as WindowWithEpi;
if (win.epi) {
win.epi.unsubscribe?.('contentSaved', handleContentSaved);
}
};
}, [currentRoute, router, workId]);
return null;
};
export default OnPageEdit;
```
## Summary [#summary]
I hope this article has helped clarify how to implement on-page editing in your own headless Next.js solution. With these steps, you should be well-equipped to bring a seamless editing experience to your editors, combining the flexibility of headless architecture with the intuitive in-context editing of Optimizely CMS.
Thanks for following along-happy building!
# Going Headless - Optimizely Graph vs Content Delivery API
## Introduction [#introduction]
As the demand for flexible, multi-channel digital experiences grows, more development teams are turning to **headless CMS architectures** to future-proof their solutions. Optimizely offers two primary options for headless content delivery: the **Content Delivery API (CDA)** and the newer **Optimizely Graph**.
But which one should you choose - and why?
I recently faced this exact question while starting a greenfield project with a headless approach. During my research, I noticed that most resources focused deeply on either CDA or Graph individually, but very few compared the two in a practical, side-by-side way.
In this article, I'll share what I learned - highlighting the **key differences in performance, scalability, routing, search**, and more. If you're planning to build a headless or hybrid app with Optimizely CMS and you're still unsure which path to take, this guide is for you.
## What Does "Headless" Mean and Why Is It Such a Hot Topic Recently? [#what-does-headless-mean-and-why-is-it-such-a-hot-topic-recently]
Before we dive in, let's quickly define "headless" and clarify what the fuss is all about!
In a **non-headless** CMS, templates, rendering logic, and UI all live in one application:
",
"graph": "graph://cms/BlogPostPage/5964702069e64c42ae151861858f0aa7",
"hierarchical": "/insights/the-benefits-of-downsizing-in-retirement/",
"internal": "cms://content/5964702069e64c42ae151861858f0aa7?loc=en&ver=20",
"type": "HIERARCHICAL"
}
}
}
]
}
}
}
```
## On-Page Editing [#on-page-editing]
One of the standout features of Optimizely CMS is its on-page editing, which allows content authors to see changes live as they work. However, in a fully headless setup, this editing experience doesn't come for free.
In both **Content Delivery API** and **Optimizely Graph** approaches, **on-page editing requires custom implementation** to integrate with the CMS editor and preview modes.
**Content Delivery API**
Using CDA, you can support on-page editing by configuring your front-end app to detect Optimizely's Edit Mode and handle it accordingly. Key requirements include:
* Supporting query parameters like `?epieditmode=true` and `?id=123`
* Resolving content in preview or draft mode
* Ensuring that URLs resolve properly to content in CMS edit view
A helpful reference implementation can be found here: [On-page editing with Optimizely CMS on an externally hosted site](https://docs.developers.optimizely.com/content-management-system/docs/on-page-editing-with-optimizely-cms-on-an-externally-hosted-site).
This setup allows content editors to use the familiar CMS UI while seeing a live rendering of content changes on your front-end app - provided it's properly connected via CDA.
**Optimizely Graph**
Optimizely Graph also supports on-page editing, but in a slightly different way. The key concept is that **Graph receives published and preview content from the CMS**, and you can query that using specific parameters or endpoints.
To enable on-page editing, you'll need to:
* Configure your front-end to recognize CMS editor states
* Support preview tokens or versions (e.g., previewing unpublished content)
* Adjust GraphQL queries to fetch content in preview mode
Detailed documentation and setup guide available here: [On-page editing using Optimizely Graph](https://docs.developers.optimizely.com/graph/docs/on-page-editing).
While Graph adds more flexibility in querying and rendering, it also requires a deeper understanding of how preview states are handled across the CMS and Graph layers.
## Search Capabilities [#search-capabilities]
Both Optimizely Graph and the Content Delivery API support search, but the **mechanisms and features differ significantly**.
**Content Delivery API**
* Built on **Search & Navigation** (formerly Find)
* Supports **free-text search**
* **Doesn't support semantic search**
* Enables **personalized search results** (visitor groups)
* API offers only **basic filtering and ordering.** To utilize more sophisticated features like boosting a custom implementation of search API and **Search & Navigation** on the BE side is needed.
**Optimizely Graph**
* Doesn't require Search & Navigation
* **Supports free-text and semantic search**
* Offers advanced search out-of-the-box (boosting, filters, autocomplete, and more)
* **No personalization support** (as of now)
* Offers greater flexibility, as search can be implemented on either the front-end or back-end, depending on your architecture.
## Licensing [#licensing]
Licensing costs will ultimately depend on your Optimizely contract, but there are some **structural differences** worth noting when choosing between CDA and Graph.
**Content Delivery API**
* May require a **separate license** for **Search & Navigation**
* More frontend traffic usually means **more CMS app instances** → **higher infrastructure costs** for self-hosted solutions
* More CMS instances = potentially more base licenses required
**Optimizely Graph**
* May require a **separate license** for **Optimizely Graph**
* Content is delivered via a **scalable managed service**, reducing the load (and cost) on the CMS
* **No need for Search & Navigation license**
* Can reduce the number of required CMS licenses, especially in high-traffic apps
## Summary [#summary]
| Feature | Content Delivery API (CDA) | Optimizely Graph |
| ------------------------ | ------------------------------ | ------------------------- |
| **API Type** | REST | GraphQL |
| **Scaling** | Tied to CMS instance | External managed service |
| **Routing** | Built-in URL resolution | Custom slug/url-based |
| **Nested Content Fetch** | Custom config required | Native via query |
| **Search** | Search & Navigation (optional) | Built-in, semantic |
| **Personalization** | Supported | Not supported |
| **On-page Editing** | Supported with setup | Supported with more setup |
### Content Delivery API [#content-delivery-api]
**Pros:**
* Popular and well known REST approach
* Easier routing with built-in URL resolution
* Doesn't require additional licenses
**Cons:**
* Need to scale with your CMS
* Custom configuration required for some data fetching scenarios
### Optimizely Graph [#optimizely-graph]
**Pros:**
* Query exactly what you need
* One request for nested blocks, media, etc.
* More efficient, flexible, and scalable
* Great for modern front-end frameworks
**Cons:**
* More complex routing based on content url or slug
* May require separate license
## Final Thoughts [#final-thoughts]
Going headless with Optimizely unlocks a lot of freedom and flexibility. Whether you choose CDA or Optimizely Graph - you're in a great place to build fast, modern, and scalable experiences.
Got questions or experiences with either? I'd love to hear your take!
# Part 1: Introduction
Hi, I'm Michał. I've been working with Optimizely for more than 13 years, and headless architecture is the part of that work I enjoy most. I've written about it before, on CMS 12, in my Going Headless series.
CMS 13 changes the starting point. On CMS 12, headless was one option among several and usually needed a good reason. On CMS 13, I think it's the natural default. That's why I wanted one place that walks through a complete headless build on CMS 13, from an empty project to Visual Builder, live preview, content variations and forms, in the order you'd actually build it.
This masterclass is that walkthrough. Every part is built hands-on in a real project before I write it up, so the commands and code you'll see are the ones that worked, not ones reconstructed from documentation.
## Who this masterclass is for [#who-this-masterclass-is-for]
You don't need prior experience with Optimizely headless. I'm writing for someone who may know one side of the stack well, say .NET and CMS 12, or Next.js and React, and is new to the other. Every hands-on part shows the exact commands, how to run each project, which URL to open, what you should see, and what it looks like when something goes wrong.
The CMS in this masterclass is **PaaS CMS 13**: the .NET-based Optimizely CMS that you host yourself or on Optimizely's Digital Experience Platform (DXP). It's a different product from Optimizely SaaS CMS, which Optimizely hosts for you and which is headless only.
This part has no code, so you don't need anything installed yet. For the hands-on parts, you'll need:
* The .NET SDK and Node.js, to run the CMS and the front end locally.
* Access to Optimizely with Opti ID (Optimizely's single sign-on), to connect the CMS to Optimizely Graph.
* A DXP environment and a Vercel account, for the deployment part.
Part 3 lists the exact versions and walks through the setup.
DXP isn't a hard requirement. You can follow the masterclass with the CMS hosted somewhere else, for example on Azure or on your own servers. The masterclass itself is built on DXP, though, so not every step will match your setup one to one: mainly where the Opti ID credentials come from (Part 3), how the CMS gets deployed (Part 4) and the CDN in front of your media (Part 11). In those places, you'll need to adapt the step to your own hosting.
This masterclass is built and tested on **CMS 13.6.0** and **`@optimizely/cms-sdk` 3.1.0** (the official JavaScript SDK). Newer versions will probably work, but if something you see doesn't match the article, check your versions first.
## Where CMS 13 is now [#where-cms-13-is-now]
CMS 13 reached general availability (GA) on [March 31, 2026](https://docs.optimizely.com/cms-13/release-notes/2026-optimizely-cms-13-general-availability-ga-release-notes). Like most major releases, it launched with gaps. Three pieces were announced as coming later: Optimizely Forms, the JavaScript SDK and Language Manager. On top of that, the first build had a license-checking loop that stopped the CMS from starting outside DXP, for example on plain Azure.
Those gaps closed quickly:
* **Forms 6.0.0**, the first CMS 13 version, shipped on April 9, nine days after GA. The same week, [CMS 13.0.1](https://www.gulla.net/en/blog/optimizely-cms-13-and-the-first-bug-fixes/) fixed the startup bug. Forms also has a headless API, so it's usable from a headless front end, not just from classic CMS pages.
* **The JavaScript SDK** (`@optimizely/cms-sdk`) went GA on May 4. It's now at [version 3.1.0](https://github.com/episerver/content-js-sdk/releases), which added explicit support for PaaS CMS 13.
* **Language Manager** for CMS 13 [shipped in June](https://www.gulla.net/en/blog/languagemanager-for-optimizely-cms-13-is-finally-here).
So everything that was missing at launch was there less than three months later.
Since then, releases have kept coming at a steady pace. Between October 5 and November 10 alone, CMS went from 13.3.0 to 13.6.0, adding a Preview button in Visual Builder, device preview, a refreshed CMS UI and a faster full sync to Optimizely Graph, along with fixes for regressions found along the way. You can follow them in the [CMS 13 release notes](https://docs.optimizely.com/cms-13/release-notes).
That doesn't mean everything is ready. Some popular add-ons have caught up: Forms, Language Manager, the DAM integration, Advanced Reviews and Geta's NotFoundHandler all have CMS 13 versions. The notable holdout is **Search & Navigation** (formerly Find): its latest release, from late October 2026, still supports CMS 12 only. That matters less than it sounds, because on CMS 13 Optimizely Graph is meant to take over that role. If you're planning a migration, check each add-on you depend on at [nuget.optimizely.com](https://nuget.optimizely.com/) and in Optimizely's [third-party package compatibility notes](https://docs.optimizely.com/cms-13/docs/optimizely-third-party-packages-breaking-changes) first, since this list changes from month to month.
My take: CMS 13 is a solid foundation to build on today, for a new project or a migration.
## Why headless on CMS 13 [#why-headless-on-cms-13]
I covered the general pros and cons of headless in [Going Headless: Making the Right Architectural Choices](/blog/optimizely/cms12/headless/going-headless-making-the-right-architectural-choices), so I won't repeat them here. In short, "headless" means the CMS stores and structures content and exposes it through an API, and a separate front-end application fetches that content and renders it.
What's specific to CMS 13 is that three things make headless the natural default rather than a special case.
**1. Visual Builder comes from a headless product.** Visual Builder is CMS 13's most prominent new feature: an editor where content authors put a page together from sections, rows, columns and blocks, and see the result as they go. It started in Optimizely SaaS CMS, which is headless by design. That's the setup it was built for, so a headless front end is the most direct way to get full value from it.
**2. Optimizely Graph is at the heart of a CMS 13 solution.** Optimizely Graph is a hosted GraphQL service that holds a synced copy of your content and makes it queryable. On CMS 13, content syncs there as part of the platform, and with Search & Navigation gone, Graph takes over search in most cases. The content API a headless front end needs is already in place on day one, without you building or hosting one.
**3. AI tooling makes two projects easier to maintain.** The classic cost of headless is maintaining two applications, the CMS and the front end, often in two languages. In my experience, AI coding assistants have made that noticeably cheaper, which puts headless within reach of smaller teams that couldn't justify it before.
None of this removes the trade-offs. You still host and deploy two applications, and the front end has to handle routing and preview on its own. This masterclass deals with those head-on: deployment gets its own part, and so does live preview.
## The plan [#the-plan]
The core path has eight parts. By the end of Part 8, you have a complete headless site.
1. **Introduction**: this part.
2. **Architecture overview**: how the CMS, Optimizely Graph and the front end fit together, and the stack this masterclass uses (Next.js on Vercel, with the official Optimizely SDK).
3. **Creating an empty CMS 13 project**: scaffold the CMS with Opti ID and Graph, plus a Next.js front end, both running locally.
4. **Deployment: Vercel and DXP**: deploy the front end to Vercel and the CMS to DXP.
5. **Content modeling and Visual Builder**: model your content types in the CMS and render a Visual Builder home page in Next.js.
6. **Visual Builder live preview**: let editors see their changes rendered by the real front end while they edit.
7. **Content variations**: serve a different variation of the home page, picked by a query string parameter.
8. **Forms**: build a form in the CMS and render and submit it from the Next.js front end.
After that come optional extensions. They build on the core path but aren't needed to finish it:
9. **Forms: authenticated submission**: require a token to submit a form, both for a server-side app and for a signed-in user.
10. **Multisite**: run a second site from the same CMS instance, with its own content and content types.
11. **Images and CDN**: deliver media through the DXP CDN in a production-ready way.
Parts will show up in the sidebar as they're published, and the plan may shift a little as I build. If it does, this list will change with it.
## What's next [#whats-next]
In Part 2, Architecture overview, we'll look at how the pieces of a headless CMS 13 solution fit together and settle the stack the rest of the masterclass builds on.
I hope you find this series useful. Happy coding!
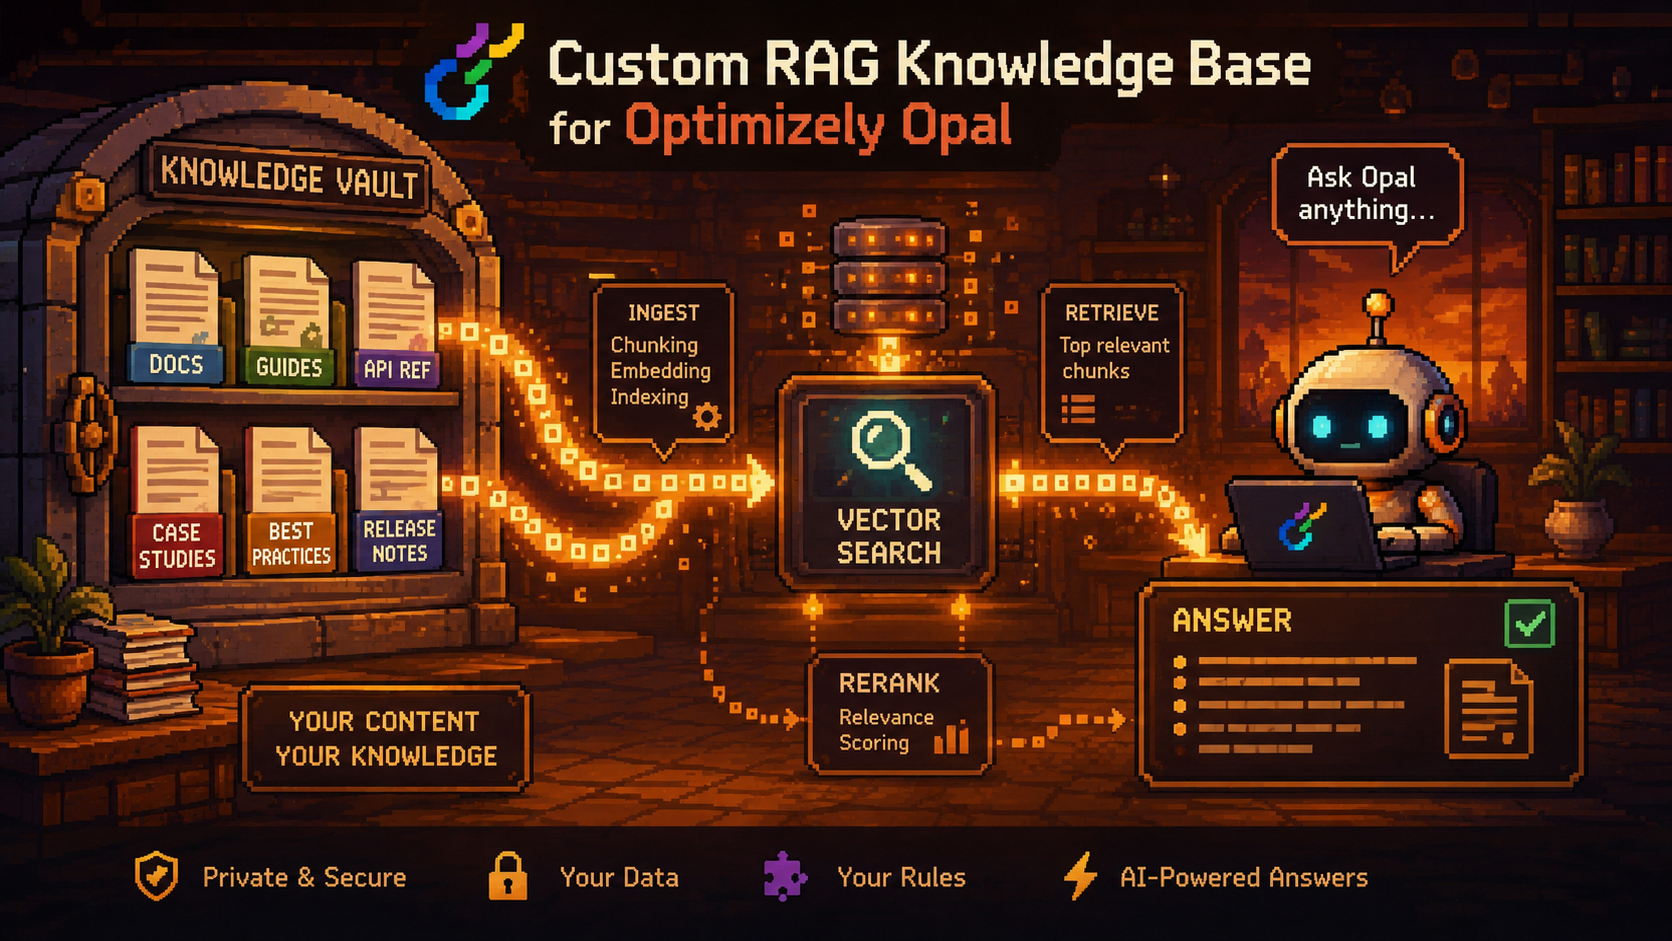 {/*
IMAGE PROMPT — Article thumbnail
Generate a 16:9 horizontal image for a blog article about building a custom RAG knowledge base for Optimizely Opal. The image should convey AI-powered document search: a knowledge vault or library of documents being queried by an AI agent, with data flowing from documents into a search system and back out as answers. Warm colors, pixel art, professional.
*/}
## A knowledge base outside Optimizely One [#a-knowledge-base-outside-optimizely-one]
As more teams put Opal agents in front of real users, a recurring question surfaces: what do you do with the institutional knowledge that isn't in your CMS? The technical docs, the compliance reports, the internal research that informs decisions but has no business living in a content management system.
Optimizely Opal uses Optimizely Graph as its built-in RAG (Retrieval-Augmented Generation) layer. At its core, RAG is a context engineering technique: language models have finite context windows, and rather than loading all your documents into every prompt, you retrieve only the passages relevant to the current query and inject just those into the model's context. Better retrieval means better answers. It also means lower token costs, because the model isn't processing irrelevant material on every request. Graph handles this for your CMS content, indexing it and making it searchable by Opal agents. For many teams, that's enough.
But there's a scenario where none of those options quite fit: you have documents you don't want to put into Optimizely One at all. Not because of a technical limitation, but by design. Internal knowledge bases, technical whitepapers, compliance documentation, research reports. Content that has no business living in a CMS, and that you'd rather not push into a Graph index tied to a specific Optimizely environment.
What you want instead is a separate RAG layer, one that your Opal agents can query as a tool, but that also remains accessible to other AI systems independently of Optimizely. A knowledge service that isn't coupled to any single platform.
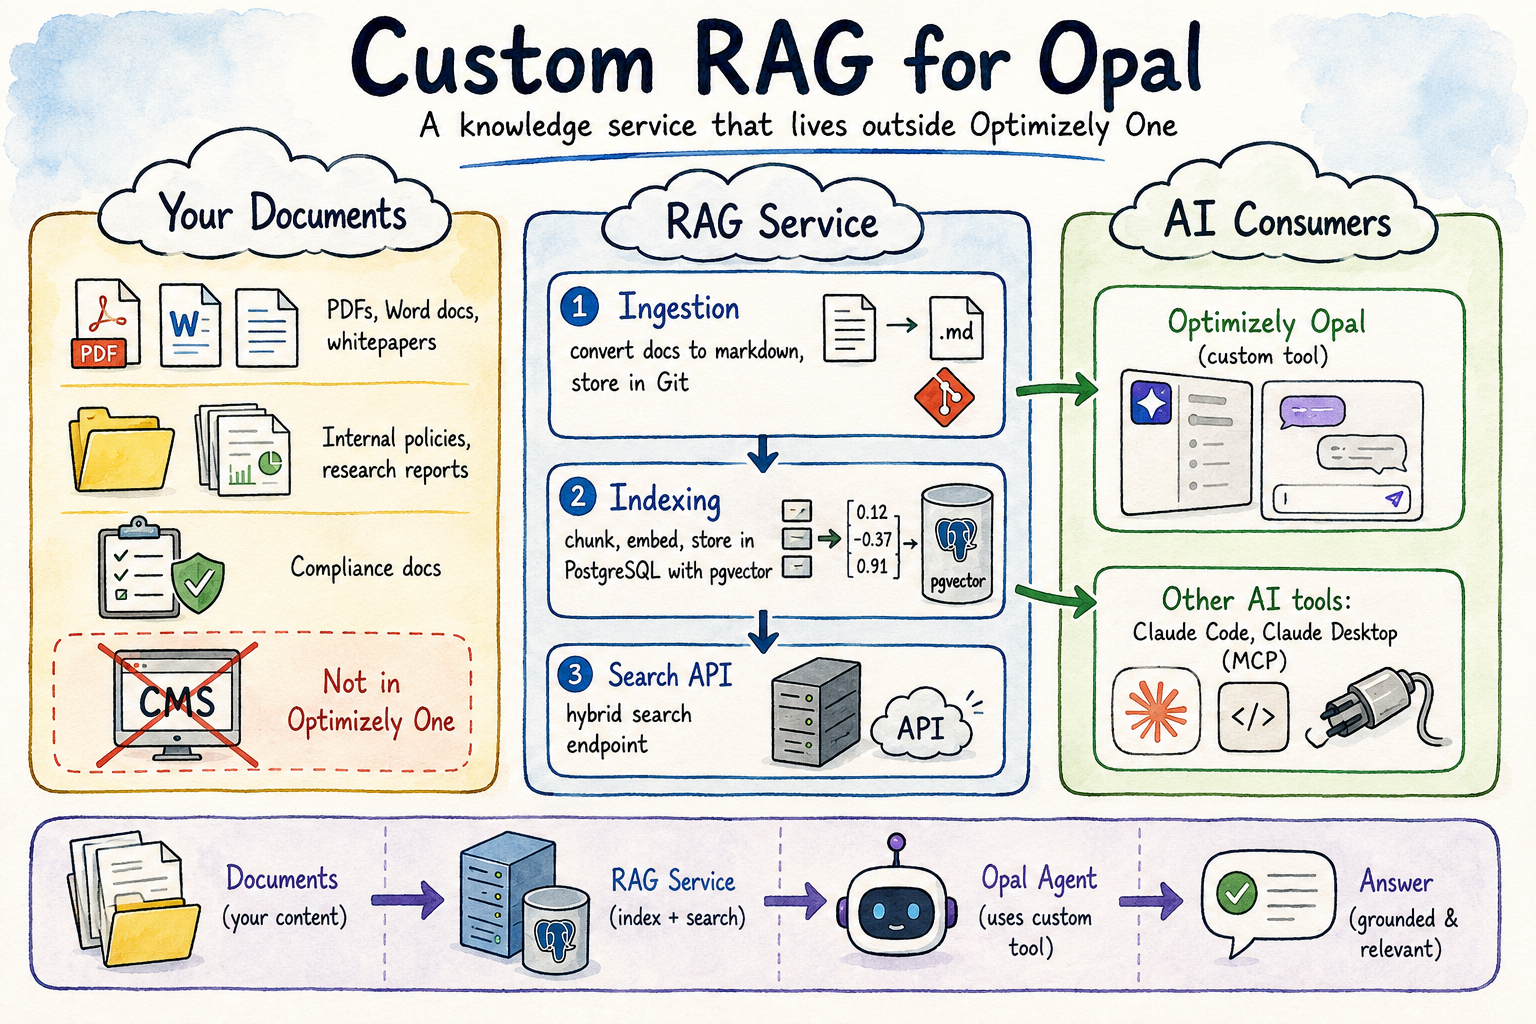 {/*
IMAGE PROMPT — Architecture overview
A hand-drawn infographic poster showing the architecture of a custom RAG knowledge base connected to Optimizely Opal.
Main headline at the top: "Custom RAG for Opal".
Subtitle: "A knowledge service that lives outside Optimizely One".
Create a 3-part horizontal layout:
Left panel:
Title in a cloud header: "Your Documents"
Show various document types that don't belong in a CMS:
- PDFs, Word docs, whitepapers
- Internal policies, research reports
- Compliance docs
Use doodle-style file icons, folder stacks, and a crossed-out CMS icon labeled "Not in Optimizely One".
Center panel:
Title in a cloud header: "RAG Service"
Show the service as a central pipeline with three stages flowing top to bottom:
- Ingestion (convert docs to markdown, store in Git)
- Indexing (chunk, embed, store in PostgreSQL with pgvector)
- Search API (hybrid search endpoint)
Use server/database icons, small arrows between stages.
Right panel:
Title in a cloud header: "AI Consumers"
Show two consumers connecting to the RAG service via arrows:
- Optimizely Opal (labeled "custom tool")
- Other AI tools: Claude Code, Claude Desktop (labeled "MCP")
Use icons for an AI chat interface and an API connector.
At the bottom, a simple linear flow: Documents -> RAG Service -> Opal Agent -> Answer
Mood: practical, architectural, modern.
Style: hand-drawn infographic, pastel watercolor background, thick dark outlines, playful but professional, readable text, cloud-like section headers, soft yellow/blue/green palette, 16:9 horizontal composition.
*/}
## The pattern: build your own RAG, expose it as an Opal tool [#the-pattern-build-your-own-rag-expose-it-as-an-opal-tool]
The good news is that Opal's tool system gives you an extension point. You can build a standalone RAG service (completely outside Optimizely One) and register it as a custom tool. Once registered, Opal agents can query it just like they query Graph: by asking a natural language question and getting back relevant content.
The solution has two independent parts:
1. **A RAG service:** a pipeline that ingests your documents, indexes them for semantic and keyword search, and exposes a search API
2. **An Opal tool wrapper:** a thin integration layer that bridges Opal's tool protocol to your search API
These parts are deliberately separate. The RAG service is general-purpose infrastructure; it doesn't need to know anything about Opal. The tool wrapper is a thin adapter: it handles the Opal protocol and delegates the actual search logic to the service.
## Designing the RAG service [#designing-the-rag-service]
A RAG pipeline has three stages: ingestion, indexing, and retrieval. Each has design decisions worth thinking through.
### Ingestion: getting documents into a consistent format [#ingestion-getting-documents-into-a-consistent-format]
Documents come in many formats: PDF, Word, PowerPoint, HTML, plain text. Before you can index them, you need a canonical representation. Markdown works well for this: it preserves structure (headings, lists, tables) while being straightforward to parse and chunk. Tools like [Docling](https://github.com/DS4SD/docling) can convert most office formats to clean markdown automatically.
The ingestion step is usually a one-off or scheduled batch job, not part of the hot path. Think of it as a preprocessing pipeline that runs whenever your document corpus changes.
A practical setup is to store the converted markdown files in a version-controlled repository. Your indexer watches that repository and re-indexes only files that have changed since the last run. This keeps ingestion lightweight and auditable: you can always see what version of a document was indexed and when.
### Indexing: chunks, embeddings, and storage [#indexing-chunks-embeddings-and-storage]
Raw documents are too large to pass directly to a language model. A single whitepaper might run to tens of thousands of tokens, and passing the whole thing for every query would flood the context window with irrelevant material. The model's attention would dilute across content that has nothing to do with the question, and your token costs would climb accordingly. Chunking solves this: you break documents into smaller passages so that retrieval can be selective, putting only what's relevant into the model's context.
The chunking strategy matters more than it might seem. Fixed-size chunking (split every N characters or tokens) is simple but often cuts across logical boundaries, splitting a paragraph mid-sentence or separating a heading from the content it introduces. A better approach is structure-aware chunking: split on heading boundaries, so each chunk corresponds to a coherent section of the document. When a section exceeds your target token budget, fall back to paragraph-level splitting within that section.
One underrated technique: prefix each chunk with its heading hierarchy. A chunk extracted from a section three levels deep might be opaque on its own. But if you prepend something like `Product Overview > Technical Specifications > Authentication`, the chunk becomes self-contained. An LLM reading it has immediate context about where in the document structure this information lives.
Once you have chunks, you need to embed them. Embedding models convert text into high-dimensional vectors that encode semantic meaning. Chunks with similar meaning end up close together in vector space, which is what enables semantic search. Azure OpenAI's `text-embedding-3-small` is a solid, cost-effective choice with good multilingual coverage.
For storage, PostgreSQL with the [pgvector](https://github.com/pgvector/pgvector) extension is a practical choice that avoids introducing a separate vector database. You get HNSW indexes for approximate nearest-neighbor search, full SQL query flexibility, transactions, and the operational simplicity of a database you likely already know how to run. Dedicated vector databases (Pinecone, Weaviate, Qdrant) are worth evaluating if you're indexing millions of chunks or need advanced filtering, but for most enterprise knowledge base scenarios, pgvector is sufficient.
A minimal schema has two tables: `documents` (path, hash, full content) and `chunks` (chunk text, embedding vector, full-text search index, reference to the parent document). The document hash enables incremental re-indexing: compare the current file hash against the stored hash, and only re-chunk and re-embed files that have changed.
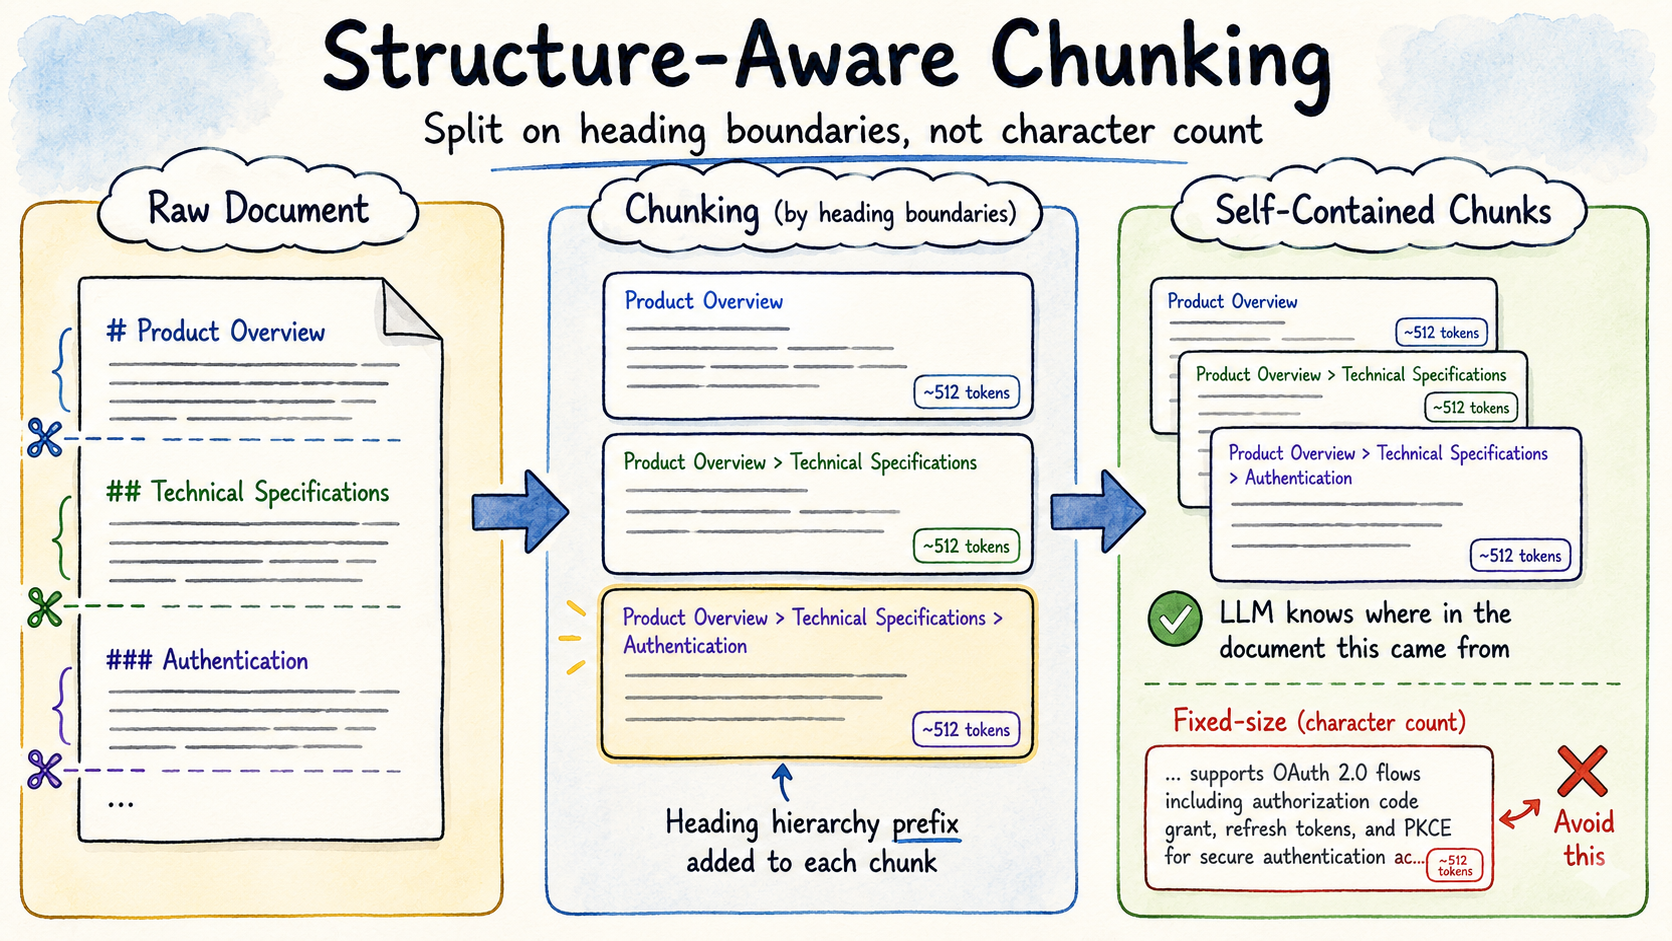 {/*
IMAGE PROMPT — Structure-aware chunking with heading hierarchy
A hand-drawn infographic poster explaining document chunking for RAG systems.
Main headline at the top: "Structure-Aware Chunking".
Subtitle: "Split on heading boundaries, not character count".
Create a left-to-right flow layout:
Left section:
Title in a cloud header: "Raw Document"
Show a doodle-style document with a visible heading structure:
- # Product Overview
- ## Technical Specifications
- ### Authentication
Use heading markers (#, ##, ###) visibly drawn in the document, with body text lines below each heading.
Center section:
Show the chunking transformation with a large arrow pointing right.
Show scissors icons cutting the document at each heading boundary.
Each resulting chunk is shown as a card. One card is highlighted showing:
- At the top, in smaller text: "Product Overview > Technical Specifications > Authentication"
- Below: the chunk body content
Label below the cards: "Heading hierarchy prefix added to each chunk".
Add a small token counter on each card: "~512 tokens".
Right section:
Title in a cloud header: "Self-Contained Chunks"
Show 3 chunk cards stacked slightly, each with the hierarchy breadcrumb visible at the top.
Add a checkmark: "LLM knows where in the document this came from".
Show a crossed-out comparison below: a "Fixed-size" chunk cutting mid-sentence, labeled "Avoid this".
Mood: educational, technical, clear.
Style: hand-drawn infographic, pastel watercolor background, thick dark outlines, playful but professional, readable text, cloud-like section headers, soft yellow/blue/green palette, 16:9 horizontal composition.
*/}
### Retrieval: why hybrid search beats pure vector search [#retrieval-why-hybrid-search-beats-pure-vector-search]
When a user asks a question, you need to find the most relevant chunks. Two approaches are common:
**Vector (semantic) search:** embed the query, find chunks with the most similar embedding. This works well for conceptual questions and paraphrased queries where the exact words don't match.
**Full-text search (BM25/keyword):** traditional inverted index search. This works well for specific terms, product names, error codes, and other cases where the exact words matter.
Neither approach is universally superior. Vector search misses exact-match queries where vocabulary matters. Keyword search misses semantic similarity. The solution is to run both and fuse the results, a technique called Reciprocal Rank Fusion (RRF).
RRF is straightforward: rank each result set independently, then combine the rankings using a formula that rewards appearing high in *either* list. The parameter `k` (commonly 60) controls how much weight to give to rank position versus rank distance. The combined ranking tends to be more robust than either approach alone.
PostgreSQL makes this convenient. The same database serves both search paths: `pgvector` handles the vector similarity search, while PostgreSQL's native `tsvector` and `tsquery` handle full-text search. A CTE-based SQL query can compute both rankings and fuse them in a single round-trip.
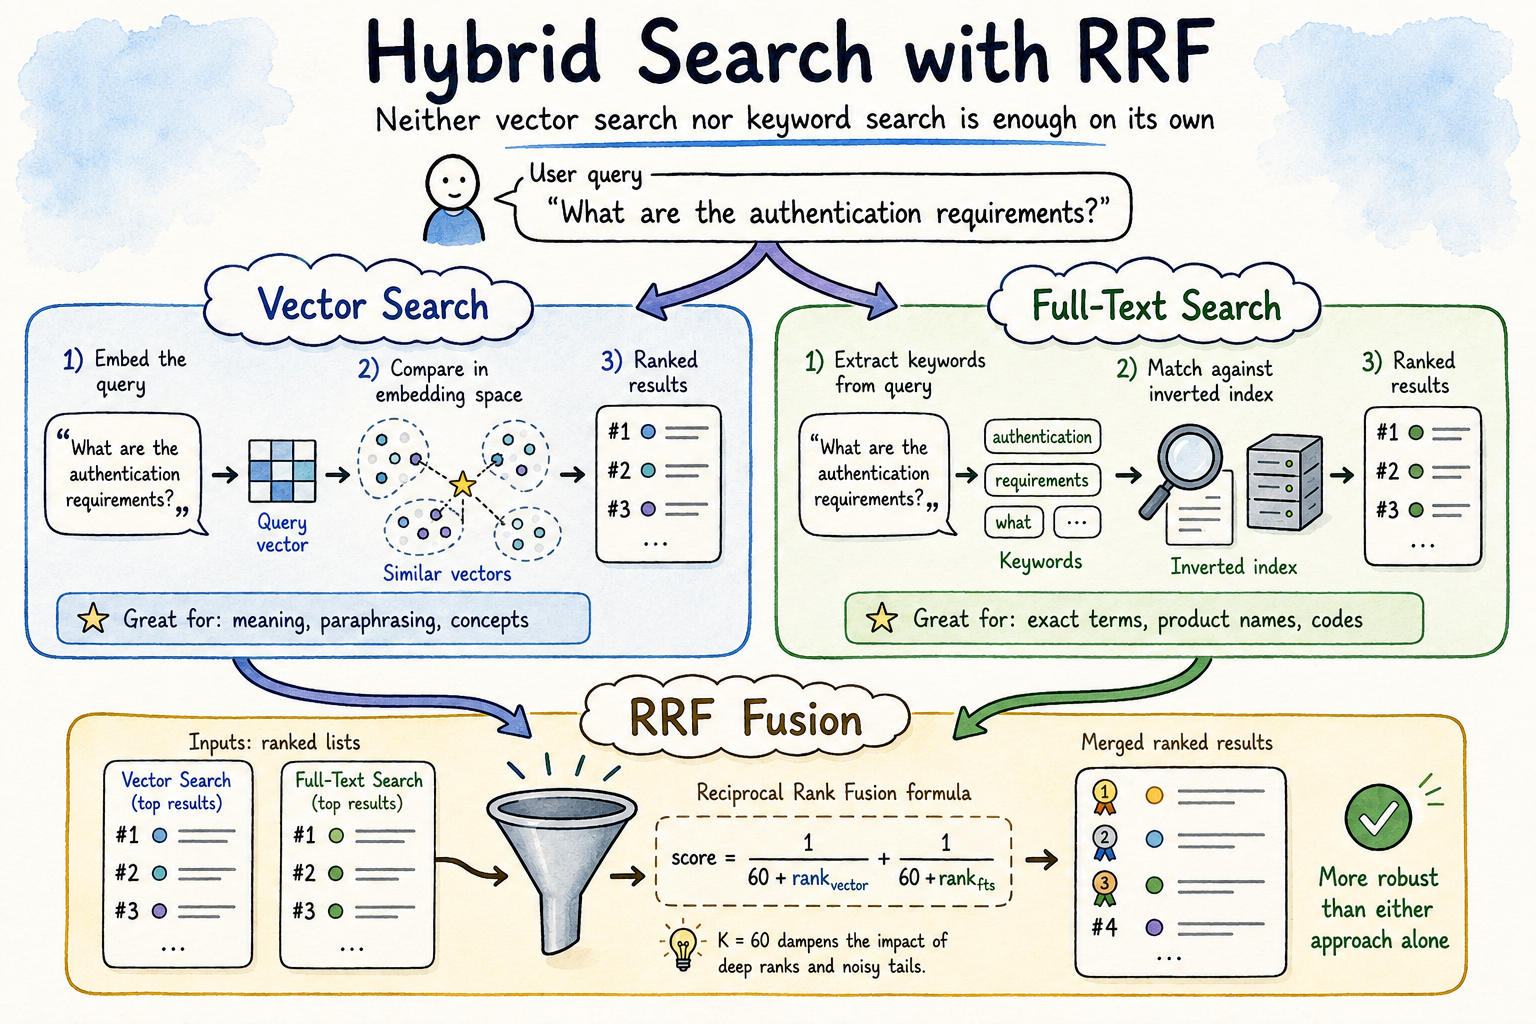 {/*
IMAGE PROMPT — Hybrid search with Reciprocal Rank Fusion (RRF)
A hand-drawn infographic poster explaining hybrid search and Reciprocal Rank Fusion.
Main headline at the top: "Hybrid Search with RRF".
Subtitle: "Neither vector search nor keyword search is enough on its own".
Create a funnel layout with two parallel lanes that merge at the bottom:
Top:
Show a user query entering: "What are the authentication requirements?"
A large arrow splits it into two paths going down.
Left lane:
Title in a cloud header: "Vector Search"
Show the query being converted to a small grid/vector icon, then compared against a cluster of similar vectors.
Show results as a numbered ranked list: #1, #2, #3...
Label at the bottom: "Great for: meaning, paraphrasing, concepts"
Use neural network / embedding space doodle icons.
Right lane:
Title in a cloud header: "Full-Text Search"
Show the query broken into keywords with a magnifying glass, matched against an index.
Show results as a numbered ranked list: #1, #2, #3...
Label at the bottom: "Great for: exact terms, product names, codes"
Use classic index/search doodle icons.
Bottom section:
Title in a cloud header: "RRF Fusion"
Show both ranked lists flowing into a funnel or merge symbol.
Show a simple formula hint: score = 1/(60 + rank_vector) + 1/(60 + rank_fts)
A final merged ranked list emerges: top results combining both signals.
Label: "More robust than either approach alone".
Mood: technical, explanatory, satisfying.
Style: hand-drawn infographic, pastel watercolor background, thick dark outlines, playful but professional, readable text, cloud-like section headers, soft yellow/blue/green palette, 16:9 horizontal composition.
*/}
## Wiring it to Opal [#wiring-it-to-opal]
With the RAG service running, plugging it into Opal is straightforward using the [Opal Tools SDK](https://nuget.org/packages/Optimizely.Opal.Tools). If you haven't worked with Opal tools before, [Building AI-Powered Tools with Optimizely Opal](/blog/opal-tools-tutorial) covers the SDK setup, tool registration, and authorization from scratch.
The integration needs two tools:
* **search:** takes a natural language query, runs it against the RAG service, returns ranked chunks with their source path and content
* **get-document:** takes a document path, returns the full markdown content of that document
The `search` tool is what Opal calls first to understand what's in the knowledge base. The `get-document` tool lets it retrieve broader context when chunks alone are not enough, for example when summarizing a full whitepaper rather than answering a specific question.
In the Opal SDK, tools are C# methods decorated with attributes:
```csharp
[OpalTool(Name = "search")]
[Description("Search the knowledge base for relevant content. Returns ranked chunks with source path and content.")]
public async Task